Multisite is a WordPress feature which allows users to create a network of sites on a single WordPress installation. Available since WordPress version 3.0, Multisite is a continuation of WPMU or WordPress Multiuser project. WordPress MultiUser project was discontinued and its features were included into WordPress core.
WordPress Multisite Network Features
- You can run a network of multiple WordPress blogs and websites from a single WordPress installation.
- You can have a network of subdomains like http://john.example.com or directories like http://www.example.com/john/.
- Open up your WordPress Multisite Network for other users to create an account and get their own WordPress blogs.
- As a Super Admin you can install themes and plugins and make them available to all other sites on the network. However, other site admins on the network will not have the capability to install themes or plugins
- As Super Admin you can change make changes to themes for all websites. Website Admins can not make changes to their themes.
How to enable Multisite Network in WordPress
First thing you need to do is to install WordPress. After that connect to your website using an FTP client like FileZilla. Edit the file wp-config.php, and add the following line just before That’s all, stop editing! Happy blogging.
/* Multisite */
define('WP_ALLOW_MULTISITE', true);
Save your wp-config.php file and log in to your WordPress website. Go to Tools » Network Setup. This is the place where you will configure and set up your WordPress Multisite Network:
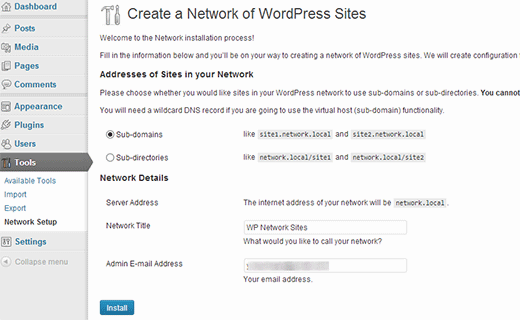
On the network set up screen, you need to choose whether you want network sites to be on their own subdomains or sub-directories. Choose wisely because you can not change it later. If you choose subdomains, then you will have to change your DNS settings for domain mapping. We will get to that part later.
In the network details section, give your network a name and an admin address. Click on Install button.
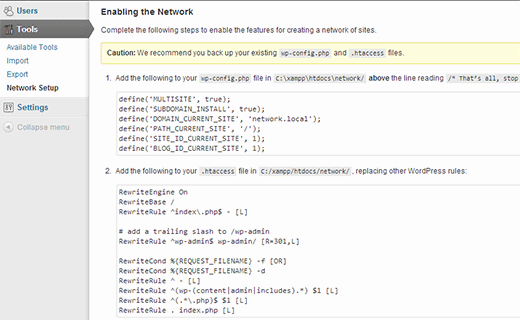
On the next screen, WordPress will provide you some code that you need to add to wp-config.php and .htaccess file. Both files are located in your WordPress root directory. Connect to your website using an FTP client and open these files and paste the code provided by WordPress.
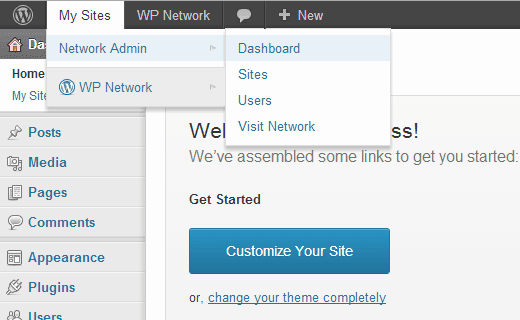
Once you have successfully updated both files. You will have to login again to your WordPress admin area. After the login you will see WordPress Multisite Network menu on top in the WordPress admin bar.
Enabling Sub-Domains in Multisite by Adding Wildcard Subdomain
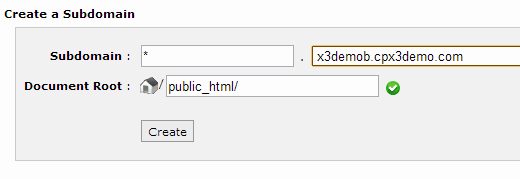
You’ll need to create a subdomain with ‘*‘ as the subdomain name. For example, if your WordPress is installed at www.example.com then you need to create a subdomain *.example.com. However, this subdomain should point to the same directory where your WordPress is installed. We will show you how to create a wildcard subdomain in cPanel.
Log in to your cPanel dashboard and then under the Domains section click on Subdomains. On the next screen simply enter * in the subdomain field. Make sure that the document root field is pointing to the directory where you have WordPress installed. This is the directory where wp-config.php file resides. Hit the create button to add the subdomain.
WordPress Multisite Network Settings
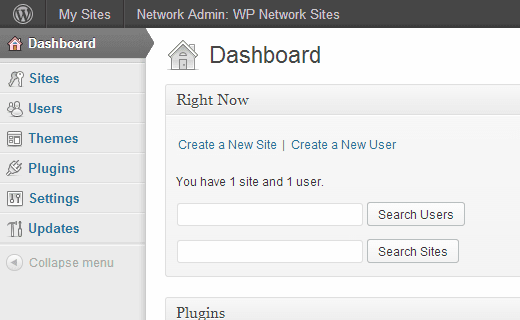
Take your mouse over to My Sites in WordPress admin bar and then click on Dashboard. This is the dashboard for your Multisite network. You can add or delete sites, install plugins and themes, and manage users from here.
To manage your Multisite network settings. Go to Settings » Network Settings. This is the page where you can open up your website for registration. You can allow users to create accounts and create sites. However, you can leave registration disabled if you want to manually add users and sites yourself.
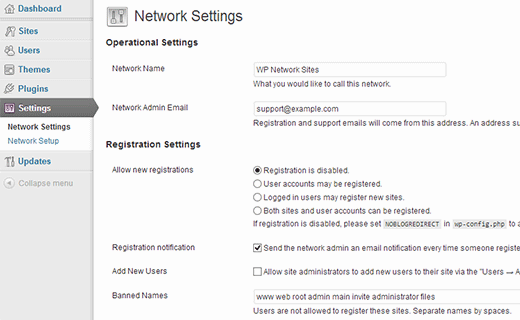
Among other settings you can edit the emails sent by WordPress when a user creates a new site. You can change the text of default post, page and comment added by WordPress on new sites. Just remember that the settings here will affect all sites and users on your website so you need to be careful.
Managing Sites in WordPress Multisite Network
Sites in a Multisite WordPress can be managed from Sites screen under the Multisite Dashboard. Among these settings, you can not only add or delete, but also deactivate and archive sites.
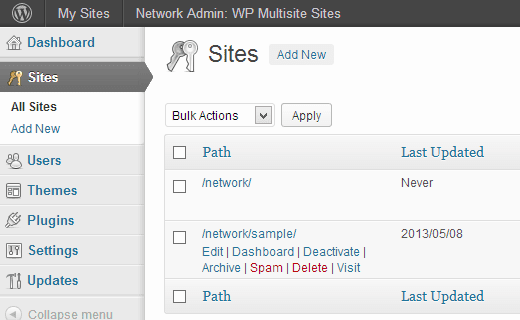
When a Multisite site is deactivated, it becomes invisible to the visitors and the site admin as well. Any one visiting a deactivated website see the message “This user has elected to delete their account and the content is no longer available.”
An archived site is visible only to Super Admin. The site admin and other users or visitors to the site will see the message “This site has been archived or suspended.”
Super Admin can also mark a site as spam, which will make the site invisible to everyone, including the site admin. Deleting a site permanently removes it from the network.
This post was originally published in the wpbeginner glossary.