DNS or Domain Name System is a system that points a domain name to physical IP address. For example, when a user types in www.example.com in their browser and hits enter, the DNS servers resolve it to the IP address where the website is hosted.
The purpose of DNS is to use easy to remember domain names for websites instead of their numeric IP addresses. It also enables website owners to change their web hosts without changing domain names. Website owners can simply change the DNS entry for their domain name and point to their new web host’s name servers.
What is Name Server
A Name Server (also spelled, nameserver) keeps record of your domain name’s DNS entries. For example, if your website is hosted on HostGator then the name server used to manage your DNS records will be HostGator’s generic name servers, like this:
NS1.hostgator.com
NS2.hostgator.com
NS3.hostgator.com
Each domain name must have at least two name servers. The first name server is the primary server, however if the primary server is not responding then the secondary name server is used to resolve the domain name.
WordPress hosting providers also allow users to get their own private name servers. For example, at WPBeginner we use our own private name server.
NS1.UZZ.NET
NS2.UZZ.NET
Changing Name Servers
Domain registrars usually provide domain owners easy tools to manage their name servers. Ideally it would be best if you register domain with hosting provider, this way you will not have to deal with transferring domain name or changing name servers. But sometimes you may come across situation where your domain name is registered elsewhere while your website is hosted with another service. In that case you can simply change DNS name servers and point to your web hosts name servers. For example, if your domain name is registered with GoDaddy and your website is hosted with HostGator, here is how you would change your name servers:
1. Go to GoDaddy.com and sign in.
2. Move your mouse over to domains, and then click on Domain Management.
3. Choose the domain name you want to edit and then click on Nameservers button.
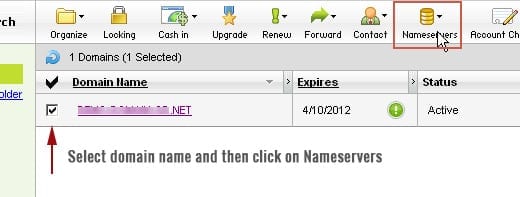
4.Click on “I have specific nameservers for my domain”, and enter HostGator’s nameservers.
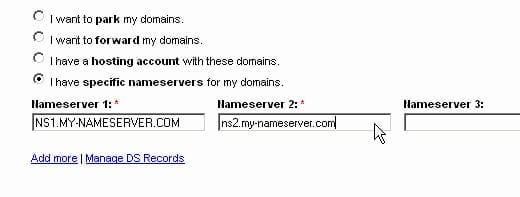
5. Click OK, and you are done.
If you have registered your domain else where, then basic instructions are the same. Just login to your domain management area and choose a domain to edit. If you do not find a way to change name servers, check your domain registrar’s support pages or email them.
What is CNAME Record
CNAME Record is a resource record to define that a domain name is an alias for another domain name. Example:
Name → CNAME
mail.example.com → go.domains.live.com
After adding the above CNAME record entry in a domain’s DNS records, visiting mail.example.com will take users to Windows live website.
How to Change CNAME Record
Changing CNAME record is particularly useful if you are going to configure your domain to use professionally branded email address with Outlook.com or some other service provider.
A lot of WordPress hosting providers offer cPanel to manage your hosting account. We will show you how to add a CNAME record in cPanel.
1. Login to cPanel and click on Simple DNS Editor under the Domains.

2. Enter name, for example, enter mail if you want to use mail.your-domain.com. It will automatically add rest of your domain name to it.
3. Enter the URL provided by your service provider. Example: go.domains.live.com
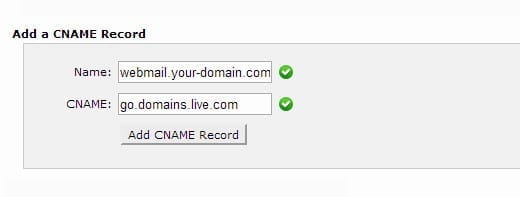
4. Click the Add CNAME Record button, and you are done.
It may take a while to get your DNS records propagated after that visiting mail.your-domain.com will take users to the URL you provided for the CNAME. If your WordPress hosting provider does not use cPanel then don’t panic. Simply go to your domains section and see if you can find DNS settings there. If you cannot find them, then ask your hosting provider. They will tell you how to add CNAME record to your DNS resources.
What is MX Record
MX record is abbreviation for Mail Exchanger record. It is a type of DNS resource record that defines a mail server to handle email for a particular domain name. For example, by adding an MX recorded provided by Outlook.com for your-domain.com, any email received by your-domain.com will be handled through outlook.com’s mail servers.
How to Add MX Record
Adding MX record entry is really simple. We will show you how to add MX record entry to your domain name using cPanel.
1. Login to your cPanel account and click on MX Entry under Mail.:
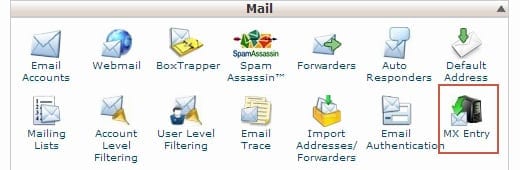
2. If you have more than one domain hosted on the server, then you will be asked to choose a domain you want to edit. After this you will be redirected to MX entry maintenance page.
3. In the email routing field choose “Automatically detect configuration”.
4. In the Add New Record section, you can left the priority 0. In the destination, enter the MX entry value provided by your mail service provider.
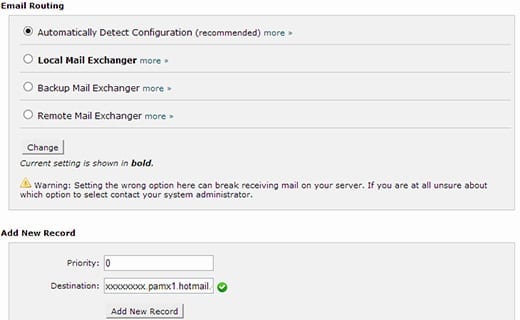
5. Click on “Add New Record” button, and you are done.
If your hosting provider does not offer cPanel, login to your hosting account and try to find Custom MX editor under Mail settings. If you cannot find it then ask your hosting provider they will show you how to add MX record entry.
What is a TXT Record
A TXT record is a DNS resource record type. Most commonly it is used to verify whether an email is actually originating from a domain name, and whether or not to trust that mail. Internet spammers sometimes send email from random domain names without actually owning those domain names, this is called email spoofing. TXT records can have SPF records which is abbreviation for Sender Policy Framework record which is used by email service providers to verify that an email message is actually coming from the same domain as it claims.
TXT records are also used to have a DKIM (Domain Key Identified Mail) record. This record adds an encrypted key in outgoing mail which allows recipient mail servers to see the originating server and whether or not to trust the message.
How to Add a TXT Record
TXT records are useful when you are using a third party mail service such as outlook.com on your own domain name. We will show you how to add a TXT record to your DNS records settings using cPanel.
1. Login to your cPanel account and click on Advanced DNS Zone Editor.

2. In the name field provide your domain name. Example: your-domain.com
3. In the TTL field enter 14400.
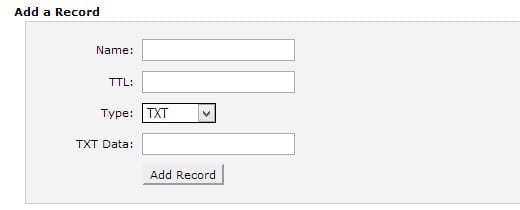
4. In the Type drop down menu, select TXT.
5. Enter value provided by your mail service provider in TXT Data field.
6. Click on “Add Record” button and you are done.
If your web host is not offering cPanel, then log in to your hosting management area, find your DNS settings page and if you don’t see a way to add TXT record then ask your hosting provider for help.
DNS records provide a convenient way for domain owners to serve their websites. However, incorrect settings could also make a website inaccessible or less secure.
This post was originally published in the wpbeginner glossary.